There are three common ways to go from nothing to a harvest of gourmet mushrooms at home, and each one hides a different amount of the work from you. That changes what you pay, what you learn and what can go wrong. One note before we start: what we sell as a "grow kit" is really the third route in a box, so weigh our opinion with that in mind. We have tried to be fair to all three.
The three routes
1. Ready-to-fruit block or kit
A block of substrate that the seller has already fully colonized with mycelium, usually supplemented sawdust or straw, packed in a box or bag. You cut it open, mist it, keep it somewhere suitable and harvest. All of the growing up to that point has been done for you.
2. All-in-one bag
One filter patch bag that holds sterilized grain and sterilized substrate together, usually as two layers. You add live mycelium of a gourmet species to the grain through the self-healing injection port. When the grain is colonized, you break it up and mix it through the substrate without opening the bag, then fruit from the same bag. Depending on the maker, the substrate layer may be a coir-based mix or supplemented hardwood sawdust.
3. Separate grain spawn plus bulk substrate
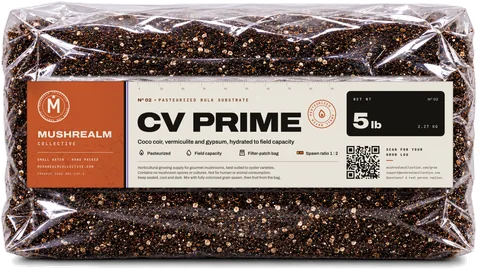
A bag of sterilized grain that you inoculate and colonize first. Once it is fully colonized, you mix it into a separate bulk substrate chosen for the species, for example a pasteurized coir and vermiculite mix for oysters, and fruit from that. This is how mushroom farms work, scaled down to a kitchen counter.
The comparison table
| Ready-to-fruit kit | All-in-one bag | Grain spawn + bulk substrate | |
|---|---|---|---|
| Cost per harvest | Highest | Medium | Lowest, and falls as you scale |
| Your steps | Open, mist, harvest | Inoculate, wait, mix inside the bag, fruit | Inoculate, wait, spawn to bulk, fruit |
| Control | Almost none | Low: ratio and substrate fixed by the maker | High: ratio, substrate, timing and scale |
| Contamination risk | Very low: already colonized | Low at inoculation, but all or nothing | Low with clean technique; one brief open step |
| Yield | One block's worth | One bag's worth | Scales with how much substrate you fruit |
| Learning value | Low | Medium | High |
| Species choice | Whatever the seller has colonized | Any species you can inoculate, if it suits the substrate in the bag | Any species: you match the substrate to it |
| Time to first harvest | Often 1 to 2 weeks after opening | Several weeks | Several weeks |
Ready-to-fruit kits: pros and cons
Pros. The least effort of any route. Nothing to inoculate, nothing to mix, and almost nothing to go wrong before fruiting. A kit makes a great gift, a good project with children, and a cheap way to find out whether you enjoy watching mushrooms grow before you buy anything else. It also shows you what good fruiting conditions look like, which is useful later.
Cons. You pay for all the work that went into it, so the cost per harvest is the highest of the three. A block usually gives one to three flushes before it is spent, and the species list is whatever the seller offers. You also skip the stages where most of the learning happens: getting grain colonized, spawning, and judging when a bag is ready.
All-in-one bags: pros and cons
Pros. One sealed bag from start to finish, with no transfer step and no moment where the contents meet open air. You need very little equipment, and the whole grow stays tidy on a shelf. For someone who wants to inoculate their own bag but is nervous about opening anything, that is a real advantage.
Cons.
- The ratio is fixed. You get whatever grain to substrate ratio the maker chose, and you cannot add more grain for a faster run.
- You cannot check the grain before committing. The grain sits next to the substrate the whole time. If contamination starts in the grain, the substrate goes with it, and you lose everything in the bag.
- Sterile substrate has no defenders. Because the substrate is sterilized with the grain, nothing is living in it. A contaminant that gets in early meets no competition.
- Scale means more bags. To grow more, you buy more all-in-one bags, so the cost per harvest stays flat.
- Mixing is awkward. Working colonized grain through substrate in a crowded sealed bag takes patience.
Grain spawn plus bulk substrate: pros and cons
Pros.
- You check the grain first. You only commit substrate to grain that is fully colonized and clean. A bad grain bag costs you a grain bag, nothing more.
- You choose the ratio. More grain colonizes faster, less stretches further. The spawn to bulk guide explains the trade-off, and our spawn to bulk calculator does the sums.
- You match substrate to species. Coir and vermiculite for oysters, supplemented hardwood for wood lovers. See how to choose a mushroom substrate.
- It scales. One grain bag can spawn one large grow or several small ones, and a little colonized grain can inoculate a fresh grain bag, which stretches your starting material further.
- The skills transfer. Everything you learn here applies to any species and any size of grow.
Cons. There is one extra step, spawning, where you open the bags briefly and clean technique matters. You have two products to time and store instead of one. And there are more decisions to make, which is a pro once you know what you are doing and a mild hurdle at first. Our clean technique guide covers what you need for that open step.
An honest note on our own range: our CV Prime is made for oysters. Wood lovers such as shiitake, lion's mane, maitake and reishi fruit best on supplemented hardwood sawdust, which we do not sell, although our grain spawn can still be used to spawn sawdust or logs you prepare yourself.
What our kit actually is
Our grow kit is route three in a box: a 1.4 kg (3 lb) milo grain bag and a 2.3 kg (5 lb) bag of CV Prime, paired at about 1 : 2 grain to substrate by weight. The grain arrives sterilized with a filter patch and self-healing injection port, and you add live mycelium of a gourmet species yourself. It is not a ready-to-fruit block, so expect a few weeks of colonizing before you see mushrooms. Our walkthrough of growing oyster mushrooms on CV substrate covers every stage.
Which route fits you
- You want mushrooms soon with no fuss, or a gift: a ready-to-fruit kit.
- You want to inoculate a bag yourself but keep everything sealed: an all-in-one bag, ideally from a maker whose substrate suits your species.
- You want to keep growing, try different species, scale up or bring the cost per harvest down: grain spawn plus bulk substrate.
A sensible path for many people is to start with route one to see whether they enjoy it, then move to route three. If you are not sure which species to start with, our guide to the easiest mushrooms to grow at home helps, and mushroom yield and biological efficiency explains how harvest size relates to substrate weight.
Quick checklist
- Ready-to-fruit kit: easiest, highest cost per harvest, least learning.
- All-in-one bag: sealed and simple, but fixed ratio and all or nothing if the grain fails.
- Grain spawn plus bulk substrate: one extra step, most control, lowest cost per harvest.
- Match the substrate to the species, whichever route you take.
- Oysters are the easiest species on every route.
Frequently asked questions
What is an all-in-one mushroom grow bag?
Are all-in-one grow bags good for beginners?
Is a mushroom grow kit worth it?
Which route gives the biggest harvest?