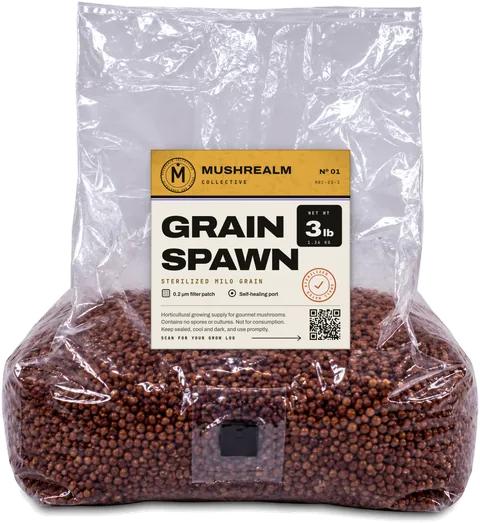
A sterilized grain bag is perfect food for mycelium, and for any mold or bacteria that gets inside. The whole skill of inoculating is adding your mycelium without letting anything else in. Here is our clean routine on the MushRealm bench, from prep to the break and shake, plus how to read the bag as it colonizes.
How a grain spawn bag works
Our grain spawn is fully hydrated milo (sorghum), pressure-sterilized and sealed in a bag with two features that matter here:
- A 0.2 micron filter patch. It lets the mycelium breathe while blocking airborne contaminants. Keep it clear and dry.
- A self-healing injection port. A rubber pad that a needle passes through and that closes again behind it, so the bag never has to be opened.
The inside is sterile when it reaches you, and your job is to keep it that way. Check the bag before you start: the grain should look even in color with no fuzz, spots or pooled water, and the bag and patch should be intact. If one arrives contaminated or damaged, send us a photo within 7 days and we will replace or refund it (see returns). Grain spawn bags explained covers the bag itself in more depth.
What you need
| Item | Why |
|---|---|
| Grain spawn bag | Sterile food for the mycelium |
| Live mycelium of a gourmet species | A liquid inoculant with a sterile needle for the port, or colonized grain for a transfer |
| 70% isopropyl alcohol and wipes | Disinfects surfaces, gloves and the port; 70% works better than stronger alcohol |
| Nitrile gloves | Cleaner than skin and easy to wipe down |
| Lighter or alcohol lamp | Flame-sterilizes the needle |
| Marker | Labels species, date and source |
| Still air box (optional) | A clear storage box with two arm holes that blocks drafts |
Prepare a clean space
Most contamination comes from moving air and hands, not from the bag.
- Pick a small room. Close the windows and doors, switch off fans, heaters and air conditioning, keep pets out and let the air settle for 15 minutes.
- Wipe the work surface with alcohol.
- Wash your hands and forearms, wear clean clothes, tie back long hair and put on gloves. Spray the gloves with alcohol and let them dry.
- Wipe the outside of the bag, paying extra attention to the area around the port.
If you have a still air box, wipe out its inside and work with the bag in it. Our clean technique guide has more.
Inoculating through the self-healing injection port
- Lay the bag flat with the port facing up. If the grain has clumped in transit, gently loosen it through the plastic first.
- Wipe the port with a fresh alcohol pad and let it dry.
- Swirl your liquid inoculant so the mycelium is evenly suspended.
- Heat the needle in the flame until it glows red along its length. Let it cool for 10 to 20 seconds without touching anything or setting it down. A hot needle kills the mycelium it delivers.
- Push the needle straight through the center of the port, then angle it toward the inside wall of the bag so you can see where the liquid lands.
- Add about a third, change the angle, add another third, then the rest. Spreading it out gives the mycelium more starting points.
- Withdraw the needle, wipe the port again and, if you like, cover it with a small square of micropore tape.
- Label the bag with the species, strain, date and source.
How much? For a 1.4 kg (3 lb) bag, 3 to 5 ml is typical. A little more speeds colonization, but too much liquid leaves the grain wet and invites bacteria.
Grain to grain transfers
The port only takes a needle, so inoculating with colonized grain (from your own previous bag, or a commercial grain spawn of the species) means opening the bag. Work in a still air box:
- Break up the colonized grain while its bag is still sealed.
- Wipe both bags, cut the new bag open above the filter patch and pour in clean, fully colonized grain. Around 10% of the new bag's weight is plenty.
- Reseal the top with an impulse sealer, or fold it tightly several times and tape it, then shake to mix.
Only transfer from a bag you are certain is clean. Any hidden contamination is copied into every bag it touches.
Incubation
- Temperature: 21 to 24°C (70 to 75°F) suits most gourmet species. Pink oyster likes it a little warmer and must not get cold.
- Light: dark or dim. Light isn't needed and can push oysters to pin early inside the bag.
- Position: flat, or upright with the filter patch clear. Don't stack bags on top of each other; colonizing grain makes heat.
- Hands off: don't open the bag or keep moving it around.
With a liquid inoculant, white growth usually shows around the injection points in 3 to 7 days. With a grain transfer, recovery is faster, often 1 to 3 days. How long grain spawn takes has timings for other species.
The break and shake at about 30%
When white patches cover roughly a quarter to a third of the grain, it is time to spread them out.
- Check the whole bag first. If there is any sign of contamination, do not shake it: you would spread the problem through all the grain.
- With clean hands, grip the white clumps through the plastic and break them apart firmly until the grain is loose.
- Shake and turn the bag so the colonized kernels are mixed evenly through the bare grain.
- Settle the grain flat, keep the filter patch clear and return the bag to incubation.
Expect a pause of a day or two while the mycelium recovers, then fast regrowth from hundreds of new starting points. Oyster bags are usually fully colonized 7 to 14 days after the shake, about 2 to 3 weeks in total. One shake is usually enough.
Healthy vs bad colonization
| What you see | What it means | What to do |
|---|---|---|
| Bright white, fluffy or rope-like growth spreading from the injection points | Healthy mycelium | Leave it alone |
| Thin, patchy, wispy white growth on lion's mane | Normal for that species | Be patient |
| Small yellow or amber droplets on the mycelium | Metabolites, common with oysters | Nothing; this is normal |
| Green patches, often white first | Trichoderma mold | Throw out unopened |
| Gray, very fine, cobwebby fluff growing fast | Cobweb mold | Throw out unopened |
| Black or blue-green dusty spots | Other molds | Throw out unopened |
| Orange or salmon powdery growth, often at the filter | Neurospora, very aggressive | Bag it and get it out of the house now |
| Wet, glossy or slimy grain, cloudy liquid, sour or rotten smell | Bacteria | Throw out unopened |
| No growth after 14 days | Weak inoculant, cold room or bacteria | Check the temperature; if nothing changes, discard |
Never open a contaminated bag indoors. Seal it inside a trash bag and put it outside. Our grain spawn contamination guide covers each one in detail.
When the bag is done
A finished bag is white on every side with no bare kernels and feels like one solid block. Give it 2 to 5 more days, then put it to work: mix it into CV substrate (see the spawn to bulk guide), use it to inoculate fresh grain bags, or use it to spawn hardwood sawdust or logs for wood lovers such as shiitake and lion's mane. A fridge slows it down for short-term holding, except pink oyster, which cold damages.
Quick checklist
- Inspect the bag when it arrives.
- Still air, and alcohol on the surface, gloves and port.
- Flame the needle, let it cool, inject 3 to 5 ml at several angles.
- Wipe, label and incubate at 21 to 24°C (70 to 75°F) in the dark.
- Break and shake once at about 30%.
- Discard anything colored, slimy or sour without opening it.
Frequently asked questions
How do you inoculate a grain spawn bag?
What is the injection port on a grain bag for?
When should you break and shake grain spawn?
How long does grain spawn take to colonize?
Is yellow liquid in a grain bag contamination?