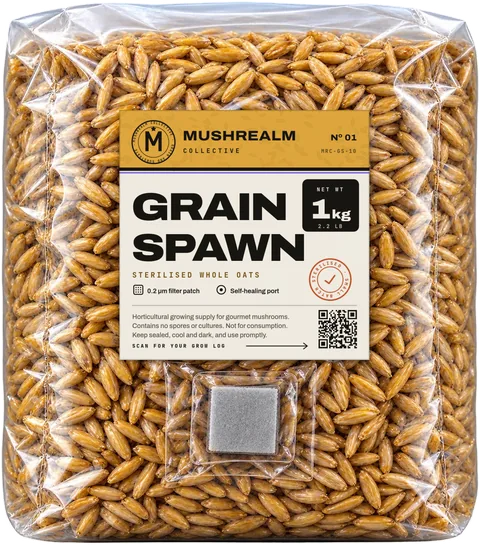
A sterilised grain bag looks simple: a clear bag of grain with a white square on the front and a small round port. Those two features are what make it possible to grow clean spawn at home without a pressure cooker or a lab. This guide explains what each part does, how to handle and store the bags, how long sterile grain realistically keeps, and how to inoculate one cleanly.
What is in a sterilised grain bag
- The grain. Hydrated so each kernel holds water inside, then pressure sterilised inside the sealed bag. Nothing living should be in it until you add your inoculant.
- The bag. Mushroom grain bags are usually made of polypropylene, a plastic that survives the heat of pressure sterilisation at about 121°C (250°F).
- The filter patch. A breathable panel heat-sealed into the bag wall.
- The injection port. A small self-sealing port for adding a liquid inoculant.
Our grain spawn is sterilised whole oats in 1 kg (2.2 lb) bags, fully hydrated and pressure sterilised, sealed with a 0.2 micron filter patch and a self-healing injection port. If you want to know how that grain is made in the first place, see what grain spawn is.
The 0.2 micron filter patch
Mycelium needs to breathe. It takes in oxygen and gives off carbon dioxide as it grows, so a fully airtight bag would eventually stall it. But an open bag would let in the mould and bacteria that float in every room.
The filter patch solves both. It is a panel of microporous material that lets gases pass through but blocks airborne particles. A 0.2 micron rating is among the finest in common use, and it is the same pore size labs use for sterile filtering, because it blocks bacteria and mould particles, which are larger. Bags with coarser patches, such as 0.5 or 5 micron, exist. They breathe a little more freely but filter less.
You might wonder whether such a fine filter lets enough air through. It does: colonising mycelium is comfortable with the raised carbon dioxide inside a sealed bag, so the slow exchange through a 0.2 micron patch is plenty during colonisation.
Looking after the filter patch
- Keep it dry. A wet filter can wick contaminants through. Do not let the grain or condensation sit against it for long, and never wash or wipe it with liquid.
- Keep it uncovered. Do not tape over it, stack bags on top of it, or stand a bag with the patch pressed against a wall or another bag.
- Do not press on it. When you handle or shake the bag, grip the plastic above the grain, not the patch.
- Check it before use. A torn, peeling or wet patch means the bag is no longer sealed.
The self-healing injection port
The injection port is a small silicone or rubber port. A needle can pass through it, and when the needle is withdrawn, the material closes up behind it. That lets you add a liquid inoculant without opening the bag, and opening the bag is the moment contaminants are most likely to get in.
A few things to know:
- Clean it every time. Wipe the port with 70% isopropyl alcohol before and after each use.
- Use it sparingly. It reseals well, but every puncture is a small risk. Inoculate in one session rather than going back repeatedly.
- It is for liquids only. A grain transfer from a previous bag cannot go through the port. For that, the bag top is opened in still air or in front of a flow hood, the colonised grain poured in, and the bag resealed, usually with an impulse sealer.
How to inoculate a grain bag cleanly
- Set up your space. Pick a clean, draft-free room. Turn off fans, air conditioning and heating vents, and close windows. Wipe your work surface with 70% isopropyl alcohol. A still air box helps if you have one.
- Clean yourself. Wash your hands and forearms, put on gloves and wipe them with alcohol. A face mask stops you breathing over the port.
- Check the bag. The seal should be intact, the filter patch dry, the grain evenly plump with no fuzz, coloured spots or pooled water, and the bag at room temperature.
- Prepare the inoculant. Use live mycelium of a gourmet species from a trusted source, and follow the supplier's guidance on how much to use for your bag size. More inoculant means more starting points and faster colonisation.
- Wipe the port with alcohol and let it dry.
- Sterilise the needle. Heat it in a flame until it glows red, then let it cool for a few seconds so it does not damage the inoculant.
- Inject. Push the needle through the port and angle it toward two or three different areas of the grain, adding a little in each, rather than one pool in one spot.
- Withdraw and wipe. Pull the needle out, wipe the port again, and cover it with a small square of micropore tape if you like.
- Label the bag with the species and the date.
- Incubate. Put it somewhere steady at 21 to 24°C (70 to 75°F) for most species, out of direct sun, with the filter patch uncovered. Leave it alone for the first few days.
Our step-by-step inoculation tutorial goes deeper, and the clean technique guide covers your workspace.
Handling and storing uninoculated bags
When your bags arrive, check them against this table before you put them away:
| Check | Good | Problem |
|---|---|---|
| Bag and seal | Intact, no punctures or split seams | Holes, tears, an open seal |
| Filter patch | Dry, flat, firmly attached | Wet, torn or peeling |
| Grain | Evenly plump, uniform colour | Fuzz, coloured spots, slime |
| Moisture | Light condensation on the plastic | A pool of water in the bottom |
| Smell near the filter | Neutral, like cooked grain | Sour or rotten |
If a bag arrives contaminated or damaged, send a photo within 7 days and we will replace or refund it (see our returns page).
To store sealed bags:
- Keep them at room temperature or a little cooler, away from radiators, heaters and sunny windows. Avoid freezing.
- Store them upright or flat with the filter patch facing up and nothing resting on it.
- Keep them somewhere clean, off the floor and away from anything mouldy, such as old fruit or compost.
- A fridge is not needed. If you do refrigerate them, let the bag come fully back to room temperature before inoculating.
- Do not open or puncture them until you are ready to inoculate.
How long does sterile grain keep?
We recommend inoculating within a couple of weeks of arrival. That is a recommendation, not a hard expiry date, and here is why it is hedged:
- The grain slowly dries. A filter patch that lets gases through also lets a little moisture out over time, so very old bags can end up drier than ideal.
- Rare problems show up with time. A tiny fault in a seal or a contaminant that survived will reveal itself the longer a bag sits.
- Storage conditions matter. A bag kept cool and out of the sun lasts better than one on a warm windowsill.
The upside is that time also proves a bag. A sealed bag that has sat at room temperature for a week or two with no growth at all is very likely sterile. Any growth before you have inoculated it means it is contaminated, so do not use it. If you are planning a batch of grows, the grain and substrate planner helps you order only what you will use soon.
After inoculation
- Keep the filter patch up and uncovered, with a little space between bags.
- Do one break and shake when roughly 20 to 30 percent of the grain is white. Our guide on how long grain spawn takes covers timing.
- Check the bag every day or two. If anything looks wrong, the contamination guide shows what is normal and what is not.
Quick checklist
- The filter patch lets the mycelium breathe and keeps contaminants out. Keep it dry and uncovered.
- The self-healing port takes a needle and reseals. Wipe it with alcohol before and after.
- Inspect bags on arrival and again before inoculating.
- Store sealed bags cool, clean and out of the sun, filter patch up.
- Inoculate within a couple of weeks for best results, and never use a bag that shows growth before inoculation.
Frequently asked questions
What does the filter patch on a grain bag do?
What is a self-healing injection port?
How long do sterilised grain bags last before inoculation?
Do I need a pressure cooker to use sterilised grain bags?
Can I reuse a grain spawn bag?